 Figure 1 : Light mounted on my bike
1. Supplies
You will need:
- A solar garden light (look for G15439 here )
- LED Lamp, from a flashlight
- Epoxy
- Wire to connect circuits
- Solder
- Tools such as a drill, a knife and a screwdriver
 Figure 2 : The tools and supplies
2. Disassemble the garden lamp
Aaaah yes, the fun and easy part. This should be easy for most people and come naturally to my readers. There are a couple of screws (ok, 3 screws to be exact) holding the two halves of the garden lights' electronic enclosure together. The plastic transparent dome pops off easily, just pull it.
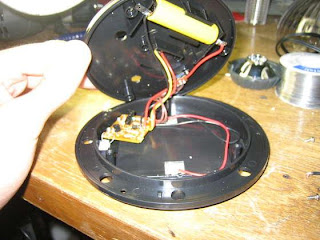 Figure 3 : On the inside you'll find the electronics
3. Add the lamp
Using your soldering iron, detach the existing LED on the garden lamp by de-soldering the wires. Put this part away in your stuff-I'll-probably-use-in-the-future box.
Now you can solder your lamp on where the previous one was attached. Just be sure you have the polarity correct. Look at the leads of the first LED before you take it off!
You can cover the soldered connections in hot glue or epoxy after you are done.
 Figure 4 : Try to do this more neat than I did
4. Make a hole to mount it on the bike
This bit depends on your bike's handlebars and where you want to put your light. I mounted my light (see Figure 1) on my handlebars by using a drill to expand one of the holes in the plastic solar panel holder. This enabled me mount the my light where my front reflector used to be.
 Figure 5 : Drilling away
5. Cut and glue/epoxy the lamp to the solar charger
Here you should be cautious. Do not rush into the cutting. In this step I used a knife to enlarge the hole opposite of the mounting hole I drilled in the previous step.
I modified the lip of the lamp and glued it into the little notch of the solar plastic. Next, I epoxied it there to make it even stronger. I also added some of the epoxy to the wires to secure them and the other circuitry.
 Figure 6 : Fitting before you cut is a good idea
6. Mount the light onto your bike
I mounted the whole contraption by removing my front reflector and just using the same screw and mounting plastic of the garden lamp.
Be sure to use a screwdriver to tighten (or loosen) things so that you can position the lamp to your liking.
Now that was easy. Have fun! Wear a helmet!
 Figure 7 : Bike assembly
 Figure 8 : Ready to go!


5 comments:
Does this design have a battery inside? It has to have some way to store the sun's energy, otherwise the light can not work...
Anthony
Anthony...
Look at figure 3. There is a yellow (probably rechargable) battery inside the plastic casing. This is what charges and gets used by the light.
Will
Thanks Will.
The yellow battery in Fig 3 is the standard battery that comes with the garden light. I didn't mention it, because you don't need to modify it in any way.
This example clearly shows us how easy it is to use renewable sources in our day to day life. All we need is a good understanding about concepts of renewable energy and little technical help. You can not only save few bucks using renewable sources to produce energy, but also you can make sure you have done your part in saving our environment.
A second thought: Even simply using a dynamo to power your lamps can be categorized as using renewable energy. Of cause you are paddling the bicycle.
Valuable information! Looking forward to seeing your notes posted.
Post a Comment